为了应对这一问题,CDN服务商将访问者的IP地址包含在X-Forwarded-用于标头和CF-Connecting-IP标头,就可以使用ngx_http_realip_module模块来获取用户真实IP了。
编译安装ngx_http_realip_module模块
通过nginx -V我们发现默认编译的nginx并不会安装ngx_http_realip_module模块,我们需要重新编译nginx使其载入这个功能模块。
方法一
这种方法几乎适用于所有nginx的环境编译,我们熟知的宝塔,LNMP等等一些列环境集成包均可使用。
#下编译安装nginx的的时候,都编译安装的哪些模块
[ root @ natural ~] #nginx -V
nginx版本:nginx / 1.14 。2
由gcc 4.4 构建。7 20120313 (红帽4.4 。7 - 23 )(GCC )
使用OpenSSL 1.1 构建。1a 2018年11 月20 日
启用了TLS SNI支持
配置参数:- prefix = / usr / local / nginx - user = www - group = www - with - http_stub_status_module - with - http_v2_module - with - http_ssl_module - with -
http_gzip_static_module - with - http_realip_module - with - http_flv_module - with - http_mp4_module - with - openssl = .. / openssl - 1.1 。1a - with - pcre = .. / pcre - 8.42 - with - pcre - jit -
与- ld - opt =  - ljemalloc
#进入到oneinstack的nginx的安装目录下,如果没有请先解压
[ root @ natural src ] #cd / root / oneinstack / src
[ root @ natural src ] #tar xzf nginx-1.14.2.tar.gz
[ root @ natural src ] #cd /root/oneinstack/src/nginx-1.14.2
[ root @ natural nginx - 1.14 。2 ] #。/ configure --prefix = / usr / local / nginx --user = www --group = www --with-http_stub_status_module --with-http_v2_module --with-http_ssl_module  -
与- http_gzip_static_module - 与- http_realip_module - 与- http_flv_module - 与- http_mp4_module - 与- openssl = .. / openssl - 1.1 。1a - with - pcre = .. / pcre - 8.42 - with - pcre - jit
- with - ld - opt =  - ljemalloc - with - http_realip_module
使
#如果出现错误,应该是依赖路径不对,请cd ..到上一个目录解压相应的软件
tar xzf pcre - 8.42 。焦油。GZ
tar xzf openssl - 1.0 。2q 。焦油。GZ
tar xzf openssl - 1.1 。1a 。焦油。GZ
#编译完成,备份原先配置,然后替换nginx的二进制文件
MV / USR / 本地/ nginx的/ sbin目录/ nginx的{,_ `日期+%F` } #备份的nginx
cp objs / nginx / usr / local / nginx / sbin
#查看是否已经把http_realip_module模块加入进去
nginx - V.
方法二
通过查看oneinstack关于nginx升级的脚本,了解到大致工作流程。通过nginx -V获取到当前nginx编译参数,并将其赋值给$ {nginx_configure_args}以便升级后保持环境支持不改变。
既然知道了流程,那么我们只需要在$ {} nginx_configure_args后面添加需要增加的部分,直接运行升级脚本即可。
#增量添加参数到$ {} nginx_configure_args后面
[ root @ natural ~] #vim /root/oneinstack/include/upgrade_web.sh
#在$ {} nginx_configure_args后面增加--with-http_realip_module即可
#大致位于升级脚本的第57行启用CDN后利用ngx_http_realip_module模块获取用户真实IP
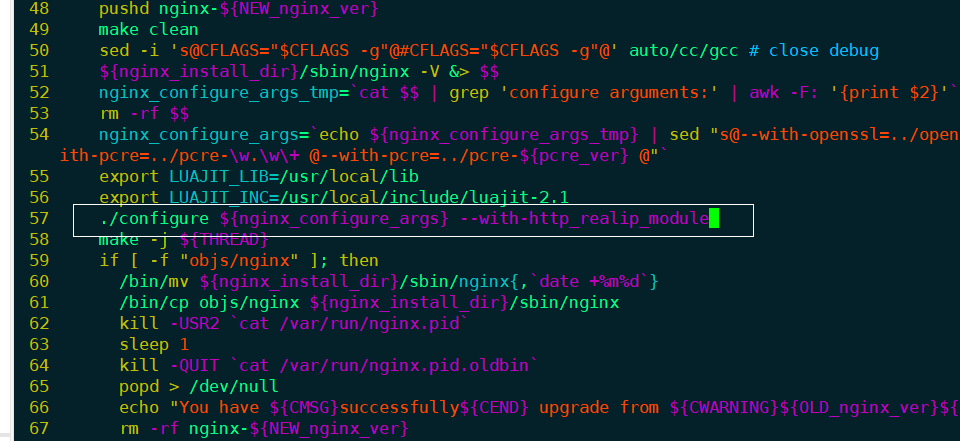
启用CDN后利用ngx_http_realip_module模块获取用户真实IP
保存并退出,执行oneinstack的升级脚本/root/oneinstack/upgrade.sh进行nginx的升级编译即可。
最后执行nginx -V查看最终编译后的结果。
nginx版本:nginx / 1.16 。0
由gcc 4.8 构建。5 20150623 (红帽4.8 。5 - 36 )(GCC )
使用OpenSSL 1.1 构建。1C 28日5月2019年
启用了TLS SNI支持
配置参数:- prefix = / usr / local / nginx - user = www - group = www - with - http_stub_status_module - with - http_v2_module - with - http_ssl_module - with -
http_gzip_static_module - with - http_realip_module - with - http_flv_module - with - http_mp4_module - with - openssl = .. / openssl - 1.1 。1c - with - pcre = .. / pcre - 8.43 - with - pcre - jit -
with - ld - opt =  - ljemalloc - add - module = .. / ngx_cache_purge - 2.3 - add - module = .. / ngx_brotli - with - ld - opt =  - Wl , - rpath ,/ usr / local / lib - add - module = .. / lua - nginx - module - add -
module = .. / ngx_devel_kit - with - http_realip_module
Nginx的设置set_real_ip_from
编译好了ngx_http_realip_module,现在我们只需要在Nginx的配置文件中添加set_real_ip_from代码到nginx.conf文件的HTTP段落里面,示例如下:
set_real_ip_from 8.8 。8.8 ; #这里是需要填写具体的CDN服务器的IP地址,可添加多个
set_real_ip_from 2.2 。2.2 ;
real_ip_header X - Forwarded - For ;
real_ip_recursive on ;
set_real_ip_from 后面的ip 可以使用103.21 。244.0 / 22 的格式量化。
如果你用的是CloudFlare的免费CDN,请将以下代码加入到你的Nginx的配置文件当中。
location / {
set_real_ip_from 103.21 。244.0 / 22 ;
set_real_ip_from 103.22 。200.0 / 22 ;
set_real_ip_from 103.31 。4.0 / 22 ;
set_real_ip_from 104.16 。0.0 / 12 ;
set_real_ip_from 108.162 。192.0 / 18 ;
set_real_ip_from 131.0 。72.0 / 22 ;
set_real_ip_from 141.101 。64.0 / 18 ;
set_real_ip_from 162.158 。0.0 / 15 ;
set_real_ip_from 172.64 。0.0 / 13 ;
set_real_ip_from 173.245 。48.0 / 20 ;
set_real_ip_from 188.114 。96.0 / 20 ;
set_real_ip_from 190.93 。240.0 / 20 ;
set_real_ip_from 197.234 。240.0 / 22 ;
set_real_ip_from 198.41 。128.0 / 17 ;
set_real_ip_from 199.27 。128.0 / 21 ;
set_real_ip_from 2400 :cb00 :: / 32;
set_real_ip_from 2606:4700 :: / 32 ;
set_real_ip_from 2803 :f800 :: / 32;
set_real_ip_from 2405:b500 :: / 32 ;
set_real_ip_from 2405 :8100 :: / 32;
set_real_ip_from 2c0f:f248 :: / 32 ;
set_real_ip_from 2a06 :98c0 :: / 29 ;
#使用以下两种中的任何一种
real_ip_header CF - 连接- IP ;
#real_ip_header X-Forwarded-For;
}
配置完成后,使用nginx -t检查配置文件是否存在格式问题。如果没有报错执行服务nginx reload重载nginx服务即可。
然后访问网站,再次查看nginx的日志,就可以正常获取到用户真实IP了。
小结
使用了CDN加速后,我们的网站获取到的用户IP变成了CDN的IP了,想要获取到用户的真实IP就得利用一些参数或者工具。前面说到的“Nginx的环境使用CDN后获取用户真实IP“也是可以使用的,这个方法更加简单,无需重新编译nginx的。
原创文章,作者:陌涛,如若转载,请注明出处:https://imotao.com/628.html
 微信扫一扫
微信扫一扫